Apple Watch OS2 App: Issues & Solutions:

iOS 9 Error:

  1. Method override for the designated initializer of the superclass ‘-init’ not found

http://stackoverflow.com/questions/25429685/turn-off-designated-initializer-checking-in-xcode-6

Solution: created own init function and parse empty value.

Watch OS2 Errors

  1. Target specifies product type ‘com.apple.product-type.application.watchapp’, but there’s no such product type for the ‘watchsimulator’ platform

https://forums.developer.apple.com/thread/5435 

Solution: Re-create the new watch os2 project and move source code

2. Debug on Simulator :

2.1 empty screen.

Solution: Scheme settings

  • The Watch Extension Scheme builds 3 Target: iPhone (2 dependencies) + Extension (no dependencies) + Watch App. Running Extension Scheme on iPhone simulator – works!

2.2 the WatchKit breakpoints are not working? In Debug Navigator: Watchkitextension installing and waiting to attach.

Solution: Install Xcode 7 beta3 -> OK.

2.3. To be able to turn off the Watch with long press on Power -> no charger !

3. Error Launching ‘WatchKit Extension’:

3.0 Change the Signing Team to my private Apple ID (for all 3: app, ext, watch) -> Free Provisioning.

3.1 Invalid Bundle – No Apple Watch Binary

Solution: Make sure the Extension and the Watchkit App targets are built first, then run the Watchkit App later on the Watch simulator -> OK !

3.2  ld: -weak_library and -bitcode_bundle (Xcode setting ENABLE_BITCODE=YES) cannot be used together
Solution: just have the bitcode for Watch app only. 

4. Deploying Glance: on Simulator okay, debug hit breakpoints. On real Watch:To Do.

5. Deploying App on iPhone: 

The flow that works:

  • In iPhone’s Watch-remove app from Watch.
  • Remove FXDebug from iPhone.
  • Run the WatchExtension scheme on the iPhone.
  • In iPhone’s Watch -install the app on Watch.
  • Run the app on Watch and then FXDebug on phone.

6. Performance:

  • Solution: move the plist to Watch App, not in Watch Extension! —> Not always running, sometimes crashed after not running for 30 seconds. 
  • Solution: mock the data, not reading from plist. —> Even when mocking the data, not reading -> it still takes a long time to run! 

7. Debug Communication:

Solution: Use Attach-To-Process to Attach the Debugger to the iPhone app.

  • First run the WatchExtension (on WatchSimulator)
  • Then run the Debug app on iPhone Simulator
  • Then Debug- AttachToProcess- AppName (iPhoneSimulator)

Caching

It is recommended to use plist for large data, NSUserDefaults for user settings. So any < 10 strings can be saved to NSUserDefaults, larger files go to plist !

http://stackoverflow.com/questions/7058858/should-i-use-nsuserdefaults-or-a-plist-to-store-data?lq=1

If data is not already in NSUserDefaults, use registerDefaults:

let prefs = NSBundle.mainBundle().pathForResource("UserDefaults", ofType: "plist");
let dict = NSDictionary(contentsOfFile: prefs!);
let defaults:NSDictionary! = dict?.valueForKey("defaults") as! NSDictionary;

NSUserDefaults.standardUserDefaults().registerDefaults(defaults);
NSUserDefaults.standardUserDefaults().synchronize();

KVO in WatchOS2

Change Notification 
- observeValueForKeyPath:ofObject:change:context: 
Registering for observation
- addObserver:forKeyPath:options:context:
Notify observers of changes:
- willChangeValueForKey: (New in watchOS 2.0)
- didChangeValueForKey: (New in watchOS 2.0)
- willChange:valuesAtIndexes:forKey: (New in watchOS 2.0)
- didChange:valuesAtIndexes:forKey: (New in watchOS 2.0)

- willChangeValueForKey:withSetMutation:usingObjects:
- didChangeValueForKey:withSetMutation:usingObjects:

How to use KVO in Watch-OS-2 for Table:

Remember, KVO works with setters and getters so we have to use self.propertyName (not accessing ivars directly) if we want to be notified. 

Remember:

1. The observeValueForKeyPath: should be implemented on the Observer, not the One whose properties are being observed.

2. The willActivate and then didDeactivate are being called on the second Page when the app launches, not only the first page.

3. For second page, the observeValueForKeyPath(2) is also called on launch. The order is (1)awakeWithContext, (2)observeValueForKeyPath, (3)willActivate, (4)didDeactivate. But the didAppear is not called for the second page (it’s not visible). On swiping to it, the willActivate and didAppear of page 2 are called. 

Apple Watch: Networking in Glance

Life Cycle of Watch app & Glance

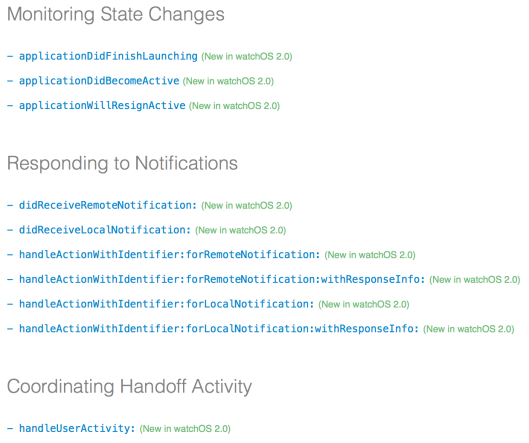
For LifeCycle in Watch OS2: check this Apple Documentation on WKExtensionDelegate.

Screen Shot 2015-07-07 at 3.26.25 pm

Firsly, in Glance Controller in Watch OS2, you see awakeWithContext, willActivate and didDeactivate. 

There is no init in Glance. 

1. AwakeWithContext (used to load data to display)

AwakeWithContext will be called once, then willActivate called every time the Glance appears.

(If this is a page-based app, awakeWithContext will be called first on all controllers before the willActivate is called on the first page. And never called again.

If this is a hierarchical app, awakeWithContext will be called for the first level only, the next levels will be created on-fly. Once we go back to original level, deeper-level controllers are deallocated -> so if you go down a level: then controller is created, init & awakeWithContext will be called again for it. Same for MODAL controllers.)

- (void)awakeWithContext:(id)context {
    [super awakeWithContext:context];
   // context is NSExtensionContext class
}

An NSExtensionContext is the host app’s context from which the app extension is invoked.

The most important part of this Context is the inputItems array.

New changes in Watch 1.0.1: page-based now will have willActivate & didDeactivate called on the next page, to prepare for that page to be ready.

tumblr_inline_nomdbqqv4O1r0hcti_540

2. WillActivate (used to update the changes of data to display)

We can only update the UI when it’s on screen (active), so any code to update UI must be called after willActivate and before didDeactivate.

3. Notifications

On lowering wrist: 

NSExtensionHostWillResignActiveNotification and NSExtensionHostDidEnterBackgroundNotification are delivered. Then didDeactivate (of the current visible controller)  is called before the app goes to SUSPENDED mode.

To kill the app, you have to use the Force-Quit mechanism (2 long press on Power button).

On raising wrist: 

In 1.0.1 willActivate is called first.

NSExtensionHostWillEnterForegroundNotification and  NSExtensionHostDidBecomeActiveNotification are delivered. Then willActivate (of the will-be-visible controller) is called before the app goes to ACTIVE mode. (1.0.0)

GLANCE Networking

1. Use Default NSURLSession – The DataTask

2. Request background (async.queue): NSProcessInfo.processInfo().performExpiring …

3. Use dispatch_semaphore to time out.

Communicating with WCSession

” The WCSession class facilitates communication between a WatchKit extension and its companion iOS app. Both processes must create and configure an instance of this class at some point during their execution. When both session objects are active, the two processes can communicate immediately by sending messages back and forth. When only one session is active, the active session may still send updates and transfer files, but those transfers happen opportunistically in the background.

To configure the session, assign a delegate to the default session object and call that object’sactivateSession method. Your WatchKit extension and iOS app each must configure their own session object. Activating the session opens a channel that allows each app to communicate with its counterpart.

For more information about implementing the delegate object, see WCSessionDelegate Protocol Reference. ” – Quoted from Apple

Application Context (link)

Application Context is the dictionary that is sent to counter-part app, can be read later when the counter-part app wakes up.

1. Updating: updateApplicationContext:

We use applicationContext to see what we have sent, and use receivedApplicationContext for what we have received from counter-part.

Important Tips

1. Always debug when Watch is on charger !

2. Each app has 5MB image cache:  addCachedImage:name: will cache encode image as PNG and cache it. If we want JPG, use addCachedImageWithData:name: -> save a lot more space.

3. We can cache image on a background thread (but then the oldest image is undetermined, we will need to manage that ourself).

4. Turn off Wrist-detection (Watch Settings) to test notifications.

5. Improve loading time by doing less in willActivate. 

6. Users can run the Watch app before the iPhone app, so always test it.

7. Use KVO to update the labels -> better than timers (only update when changed -> save battery). Check out JBInterfaceController.

8. Syncing between the iPhone app and the Watch app: when things changed on iPhone app, we need to update the Watch and vice-versa if needed.

9. While we can’t create controllers programmatically, we can hide/unhide them to have different look.

10. Watch elements only have setters, not getters, so keep the current values in a property.

11. Always use asset and store on Watch app (not extension).

12. Local notifications require soundName property!

Push Notifications on the Watch

Watch & iPhone Connected By WIFI 

Same WIFI network: on this https://discussions.apple.com/message/28204946#28204946, the Watch can connect to the iPhone through WIFI, and not only Bluetooth. But not everything will function normally, just message and ping …

OS1 without iPhone :On http://www.idownloadblog.com/2015/04/27/apple-watch-without-paired-iphone/, it shows that some Apple Watch apps like Activity, Tracking and Apple Pay still function without iPhone.

Can Watch Get Notification Without iPhone?

No. From this article http://appleinsider.com/articles/15/06/14/apple-is-making-the-watch-better-by-making-it-even-more-realtime, if you have no iPhone connected (through Bluetooth or same WIFI), the Watch would not receive notification.

Which Device will Receive Push Notification?

“Your notifications will go to your iPhone or your Apple Watch, depending on the device that you’re using.

If your iPhone is unlocked, you’ll get notifications on your iPhone, instead of your Apple Watch.

If your iPhone is locked or asleep, and your Apple Watch is unlocked and on your wrist, you’ll get notifications on your Apple Watch.” – Quoted” – Quoted

So, the iPhone has priority (over the Watch) to receive notification , if the iPhone is locked or asleep and you watch is not locked (with a passcode) -> you get the notification on Watch.

WIFI Firewall Issue

“For APNs traffic to get past your firewall, you’ll need to open these ports:

  • TCP port 5223 (used by devices to communicate to the APNs servers)
  • TCP port 2195 (used to send notifications to the APNs)
  • TCP port 2196 (used by the APNs feedback service)
  • TCP Port 443 (used as a fallback on Wi-fi only, when devices are unable to communicate to APNs on port 5223) ” – Quoted

iPhone 6 vs iPhone 6 Plus, Watch force-quit app!

iPhone 6 vs 6 Plus

If you haven’t got an iPhone 6 or 6 Plus before, just look at the right bottom: iPhone 6 has 6 holes on the right side of the charger and 6+ has 8 holes. Also you can check the Model in the back – if it’s A158* it’s iPhone 6, 6+ is A159*.

The iPhone6+ actually runs in Landscape mode, that’s why it’s called “phablet” (5.5 to 7 inches). It allows Split View Mode for the Landscape 6+, along with additional keys in the keyboard. Also we can 2-finger swipe to change tab in Safari landscape.

iphone-6plus-landscape-mode-extrakeys

Watch Apps in Background and how to Force-Quit !

Watch apps don’t just quit when they go to background. They actually stay in the background mode, so that when you launch them back to foreground, you can still be in the same page that you left.

To force-quit the app, press & hold the Watch power button for a while until you see Power Off screen, then release, press & hold again to force quit them.

Xcode 7: UI Testing

XCTest vs KIF Comparison (Medium.com Link)

This very interesting blog post by Laurin is worth studying, he showed how to use the new UI Testing provided by Xcode 7 !

Along with examples, it also has a performance comparison between KIF and XCTest for UI, with XCTest coming out slightly faster than KIF and with animations disabled, much faster. However it found that advanced tests with XCTest are still limited and so can not replace KIF yet. 

UI Testing with Xcode 7  

UI Testing is built into XCTest – on top a new version UIAutomation – more stable and reliable. Has: UI recording, automatic screenshots..

First test:

We have a controller, is the controller dismissed when tapping cancel button?

func testDismissal ()
{
    let imageController = ImagePickerSheetController()
    imageController.addAction(ImageAction(title: “Cancel”))
    rootViewController.presentViewController(imageController, animated: true, completion: nil)
    tester().tapViewWithAccessibilityLabel(“Cancel”)    
    tester().waitForAbsenceOfViewWithAccessibilityIdentifier(ID)
}

Second test:

for Crimson keyboard, when AccentView appearing, ‘e’ should be selected. Accent view should have same color as key?

To test content of a view – we can use XCUIElement property: value, this return the accessibilityValue of underlying UI element -> the AccentView:

class AccentView: UIView {
    var selectedLetter: String {
       didSet {
            accessibilityValue = selectedLetter
        }
    }
}

// This way we can check the selectedLetter of the Accent View. However the accessibilityValue is String -> cannot expose the color -> second test is not possible.

Benchmark

The result of comparing XCTest with KIF, better not relaunch for every spec (which is recommended by Apple, but should not do so)!

Normally XCTest is faster than KIF (not relaunch), but if we turn off animation, it’s nearly 4 times quicker than KIF.

So, we can set the Animations by environment:

class AppDelegate: UIResponder, UIApplicationDelegate {
    func application(application: UIApplication, didFinishLaunchingWithOptions launchOptions: [NSObject: AnyObject]?) -> Bool 
    {
        if NSProcessInfo.processInfo().environment[“animations”] == “0”    {
            UIView.setAnimationsEnabled(false)
        }    
        ...
        return true
    }
}

Summary:

XCTest is good for simple UI Tests. But KIF is more flexible.

However, XCTest is slightly faster at finding UI elements -> if animation disabled -> XCTest is really fast.

WWDC 15 – Today Extension Best Practices

(224) App Extension Best Practices

Part I. Action & Share Extensions: Sophia Teutschler ‘UIKit Engineer’

Part II. Today Widget Enhancements: Ian Baird ‘CoreOS Engineer’

  1. URL Schemes: interactions take user to app !
    • use your app’s registered URL schemes: 
    • system URL Schemes: like https (Safari)
  2. User Defaults
    • used for small pieces of configuration data
    • let defaults = NSUserDefaults.initWithSuiteName(“group.com.example.my-app”) // App Group identifier
  3.  Containers
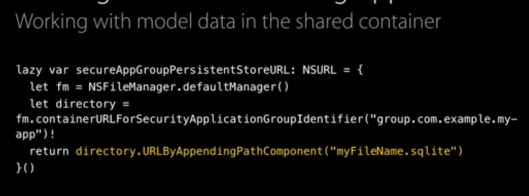
    • store Model Data in shared container (can be accessed by all extensions)
    • store Documents & Media too
    • HowTo: Setup Persistent Store CoreData in shared container: 
      fm = NSFileManager.defaultManager() 
      dir = fm.containerURLForSecurityApplicationGroupIdentifier(“group.com.example.my-app”)   
      url = dir.URLByAppendingPathComponent(“myFile.sqlite”)  
      // create storeCoordinator   
      storeCoordinator.addPersistentStoreWithType(NSSQLiteStoreType, configuration: nil, URL: url, options:…)   
      managedObjectContxt .persistentStoreCoordinator = storeCoordinator
  • Task Assertions: you want to do something uninterrupted, if interrupted -> you should clean up!
    pi = NSProcessInfo.processInfo()
    pi.performExpiringActivityWithReason(“clean-up”) {
    if (!expired) self.serializeData()
    else self.cleanupSerializeData()
    }
  • Darwin Notification Center: similar to NSNotificationCenter
    • let nc = CFNotificationCenterGetDarwinNotifyCenter()
    • CFNotificationCenterPostNotification(nc, “com.exp.app”, nil, nil, CFBooleanGetValue(true))
  • Background Refresh 
    • System will call a function to update the View for us
    • As TodayViewController conforms to NCWidgetProviding
    • widgetPerformUpdateWithCompletionHandler(completionHandler)  {
    • let updated = refreshTheModel()
    • if (updated) { view.setNeedsDisplay()   }
    • completionHandler(updated? .NewData: .NoData)
    • }
  • Networking in Background Sessions 
    • Widget can call to the Internet by itself 
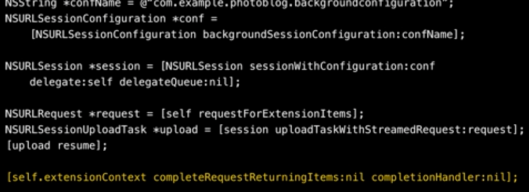
    • Important: create SessionConfiguration, set sharedContainerIdentifier for SessionConfiguration, 
    • create NSURLSession, passing the SC, use the delegate form (only the delegate form can serve the background session)
    • create NSURLRequest 
    • task = session.downloadTaskWithRequest(request)
    • task?.resume()
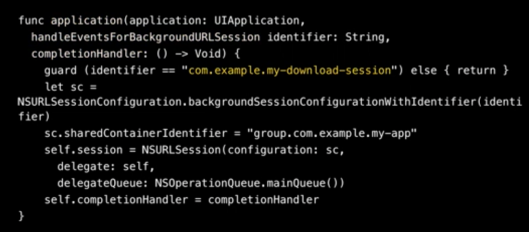
    • Have the Containing app handle background sessions (in case the Extension suspended or killed), the app will have to handle the session with application: handleEventsForBackgroundURLSession: completionHandler:)
    • make sure the identifier is the one we want to handle
    • make sure we save the completionHandler to a property
    • URLSessionDidFinishEventsForBackgroundURLSession
    • this function will handle all the response that come back from session started by Extension !!! 

4.  Keychain Items

To share the secret information in keychain: 

  • // Add an item: 
  • SecItemAdd ( { kSecAttrAccessGroup:”your-app-group” }, result: NULL )
  • SecItemUpdate, SecItemDelete, SecItemCopyMatching (Watch Security and your apps Video)

Summary

The 2nd part of this WWDC session presented some important tips about how to implement Today extension. We learned about how to:

  1. Use URL Scheme to handle user clicks on the Today widget
  2. How to share stuffs (configs etc.) between widget and the app using NSUserDefault,
  3. Share more stuffs, and Persistence using shared container
  4. Use Task Assertion to clean up in case the Extension is killed
  5. Use Background refresh to allow the system to update the Widget for us
  6. How to let Widget do it’s own networking in background session, and backup in containing app if Extension killed
  7. Sharing Security with the app in Keychain!

Apple Watch: Connectivity +FAQ, Complications, NSURLSession

(713) Watch Connectivity

Watch Connectivity (OS2) session talks about the techniques to share data between 2 apps: iPhone host app and Watch app. 

  1. How to get data over to the Watch? Firstly, we need to setup Session on both sides.
    1. Setup on both sides: let session = WCSession.defaultSession()
    2. session.delegate = self
    3. session.activateSession()
    4. iPhone app: Session state:
    5. session.paired
    6. session.watchAppInstalled
    7. session.watchDirectoryURL
  2. Categories: there are 3 types of background transfers, and 1 live transfer of data.
    1. Background transfers: 
      1. content not needed immediately (queued up)
      2. OS intelligently transfers for us
      3. sending side can exit
      4. applicationContext -> receivedApplicationContext // Override old data
      5. Sending: try { updateApplicationContext } catch {}
      6. Receiving: didReceiveApplicationContext
      7. context = Dictionary (plist types) // work well for Glances
      8. User-Info-Transfer: WCSession.defaultSession().transferUserInfo()
      9. userInfo = Dictionary (plist types) – access to queue, used for f.e level in games
      10. Receiving: didReceiveUserInfo
      11. File-Transfer: metaData (Dictionary) transferFile(: metaData:)
      12. Receiving: ~/Documents/Inbox
    2. Interactive messaging
      1. Live (f.e. game when both screens are up)
      2. Requires other app available: WCSession.defaultSession().reachable
      3. Reachable: from iPhone, asking if the Watch app is reachable.
        1. devices connected over BlueTooth or WIFI
        2. Watch app foreground (on the Watch)
      4. Reachable: from Watch, asking if the iPhone app is reachable.
        1. devices must be connected
        2. WatchKit extension foreground (? WatchKit extension, not app ?)
        3. You don’t need the iPhone app to be running, you can sendMessage to launch the iPhone app in the background.
      5. Message: Dictionary (plist types)
        1. sendMessage (message:, replyHandler:, errorHandler:) // optional handler
          1. replyHandler – recommended (confirmation)
          2. delegateCallbacks -> supply a replyHandler
        2. sendMessageData (data:, replyHandler:, errorHandler:)
  3. NSURLSession:
    1. existing Foundation class, on watchOS2 (tetherless to known Wi-Fi) 38.20
    2. Use: new content (tailored to Watch)
    3. F.e. iOS app got new content -> deliver applicationContext to Watch app!
    4. When Watch app launches -> use iOS data, while loading new content
  4. Complications: How to update Complications timeline entries!
    1. Updating clock face // using ClockKit framework
      1. let server = CLKComplicationServer.sharedInstance()
      2. server.extendTimelineForComplication(aComplication)
      3. getCurrentTimelineEntryForComplication //
      4. getTimelineEntriesForComplication //
      5. getNextRequestedUpdateDateWithHandler // suggest time to update again. Budgeted
    2. Get content:
      1. special update when reachable: use sendMessage to launch host app
      2. content can be pushed (f.e. sport score)
      3. requested interval fetch (direct from Watch to Cloud) – use NSURLSession background session
      4. keep runtime as short as possible
    3. Pushed: PushKit // use the iOS app to register the device with ApplePush server, get a PushToken, save that token with the server so
      1. pushRegistry = PKPushRegistry(queue:dispatch_get_main_queue())
      2. pushRegistry.delegate = self
      3. pushRegistry.desiredPushTypes = [PKPushTypeComplication]
      4. pushRegistry(registry: PKPushRegistry!, didUpdatePushCredentials)
      5. pushRegistry(registry: PKPushRegistry!, didReceiveIncomingPushWithPayload)
      6. session.transferUserInfo(timeLineEntry1)
      7. session.transferUserInfo(timeLineEntry2)
      8. session.transferCurrentComplicationUserInfo(presentTimeLineEntry) Budgeted
      9. Receiving: didReceiveUserInfo:
      10. PushTypeComplication has 4K payload -> use it to send all data!

(209) Creating Complications with Clock Kit

  1. Complication
    1. Small pieces of info on Clock Face. OS2 – can create own Complications.
    2. ForceTouch Face to customize – use Crown to switch Complication.
    3. Complication contain not only labels, but images !
    4. Data has to be loaded in advance – in timeline entries format !
    5. Time Travel: (OS2)
    6. Families: 5 different families
      1. Modular small: square
      2. Modular large: center rectangle
      3. Utilitarian small: small corner rectangle
      4. Utilitarian large: bottom rectangle
      5. Circular small: 4 corner squares
    7. Layout: 
      1. Modular Small: 7 templates
      2. Modular Large: 5 templates
      3. Util small: 4 templates
      4. Util large: 1 template
      5. Circular small: 6 templates
    8. CLKComplicationTemplate:
      1. Header image : CLKImageProvider?
      2. Header text : CLKTextProvider
      3. Body 1 text : CLKTextProvider
      4. Body 2 text : CLKTextProvider?
    9. CLKImageProvider
      1. backgroundImage: UIImage
      2. backgroundColor:
      3. foregroundImage: UIImage
      4. foregroundColor:  CLKImageProviderForegroundColor.White
    10. CLKTextProvider
      1. Space is very constrained
      2. Declare intentions -> system formats for us
      3. Wednesday, September 23 -> Wed, Sep 23 -> Sep 23 -> 23
        1. let sep32: NSDate =
        2. let units = [NSCalendarUnit.Weekday, NSCalendarUnit.Month, NSCalendarUnit.Day]
        3. textProv = CLKDateTextProvider (sep23, units)
      4. SimpleTextProvider, TimeTextProvider, TimeIntervalTextProvider, RelativeDateTextProvider
        1. choose style: Natural, Offset, Timer 
        2. create textProvider (date: style: units:)
        3. template.body2TextProvider = txtProv
  2. Timeline:
    1. Calendar: put event-entries when the previous event ends! -> never empty data, predictive
    2. CLKComplicationDataSource protocol
    3. getCurrentTimelineEntryForComplication (complication: withHandler) // handler takes the entries (CLKComplicationTimelineEntry) array as param
    4. getTimelineEntriesForComplication (complication: afterDate: limit: withHandler)
    5. Time Travel Direction: Stock (past = backward), Weather (future = forward)
    6. getSupportedTimeTravelDirectionsForComplications (complication: withHandler)
    7. Timeline boundariesgetTimelineEndDateForComplication & getTimelineStartDateForComplication
    8. Placeholder Template: getPlaceholderTemplateForComplication
  3. Show: Actual coding stuffs
(?) Is the NSURLSession can be done only over tetherless WIFI or the NSURL Session can utilise 3G as well?

On http://asciiwwdc.com/2015/sessions/713, it says that “If the Apple Watch does connect to known Wi-Fi networks, you can use NSURLSession to go over that Wi-Fi to connect to your servers and fetch content.” 

Another one http://asciiwwdc.com/2015/sessions/711, says that “if the Apple Watch is ” In most circumstances, if the users’ watch is nearby their paired iPhone device, then we will actually leverage the Bluetooth connection between them, perform the HTTP loads on the phone itself, and deliver the results back to the watch over Bluetooth.

If the user happens to be out and away from their phone, but with their watch, and the watch is connected to a known Wi-Fi network, then we can actually use that Wi-Fi network directly.” – Quoted

 So basically “in most circumstances“, the Watch uses it’s paired iPhone network over it’s own WiFi connection!

(?) If there is no WIFI, use WatchConnectivity:

“WatchConnectivity allows device-to-device communication between your apps”. In this case, you have to launch the iPhone app (on background) to connect to you. 

So – if you forget the phone at home and have no known WIFI -> no internet.

(?) If you have the phone with you, and you have known WIFI as well, which way you would better use, WatchConnectivity or WIFI to get new data on the Watch?

In this “http://asciiwwdc.com/2014/sessions/707

Another benefit is that in a background session, we monitor the network and power environment for you. This means that we cover things like network reachability and connectivity for you, so you don’t have to use the reachability APIs at all. We won’t attempt to establish a connection until we know that the server is reachable.

Actually just use NSURLSession and it will make sure to connect the Watch to internet for you. No need to talk to the iPhone app to do it.

(?) Is the NSURLSession is a background session only? 

(711) NSURLSession

Setup Configuration
NSURLSessionConfiguration *sessionConfig =
[NSURLSessionConfiguration defaultSessionConfiguration];
 
// restricts network operations to Wifi
sessionConfig.allowsCellularAccess = NO;
 
// sets all requests to only accept JSON responses
[sessionConfig setHTTPAdditionalHeaders:
          @{@"Accept": @"application/json"}];
 
// configures timeouts & restricts app to only have one network connection to a host
sessionConfig.timeoutIntervalForRequest = 30.0;
sessionConfig.timeoutIntervalForResource = 60.0;
sessionConfig.HTTPMaximumConnectionsPerHost = 1;
Creating Session:
// set the image URL
NSString *imageUrl = @"http://......png";
 
// create the default session configuration
NSURLSessionConfiguration *sessionConfig =
  [NSURLSessionConfiguration defaultSessionConfiguration];
 
// create a session using the current class as a delegate
NSURLSession *session =
  [NSURLSession sessionWithConfiguration:sessionConfig
                                delegate:self
                           delegateQueue:nil];

Download File

// the task is created from a session
NSURLSessionDownloadTask *getImageTask =
[session downloadTaskWithURL:[NSURL URLWithString:imageUrl]
 
    completionHandler:^(NSURL *location,
                        NSURLResponse *response,
                        NSError *error) {
        // the image is uploaded as NSData
        UIImage *downloadedImage =
          [UIImage imageWithData:
              [NSData dataWithContentsOfURL:location]];
      // update UIImageView image to show the new file
      dispatch_async(dispatch_get_main_queue(), ^{
        // do stuff with image
        _imageWithBlock.image = downloadedImage;
      });
}];
 
// start up the task
[getImageTask resume];

Get JSON

NSURLSessionDataTask *jsonData = [session dataTaskWithURL:yourNSURL
      completionHandler:^(NSData *data,
                          NSURLResponse *response,
                          NSError *error) {
        // handle NSData
}];

Other Sample Code

Screen Shot 2015-06-24 at 3.59.11 pm Screen Shot 2015-06-24 at 5.07.47 pm Screen Shot 2015-06-25 at 10.35.15 am Screen Shot 2015-06-25 at 10.36.56 am

WWDC 15 – Advanced NSOperations

(226) Advanced NSOperations

NSOperations are now the technology that the iOS, OS X and Watch apps rely on to perform responsive,

WWDC app

    1. Core Concepts
      1. NSOperationQueue
        1. high level dispatch_queue_t
        2. make it easy to cancel any operation !
        3. maxConcurrentOperationCount = 1 -> serial queue
        4. maxConcurrentOperationCount = Default // as many as system allows
      2. NSOperation
        1. high level dispatch_block_t
        2. long-running task // milli-seconds to minutes
        3. subclass-able:
        4. start in pending-state
        5. pending -> ready -> executing -> finished 
        6. Can be CANCELLED anytime before finish !!! // cancel()
        7. Cancelling: observe the cancelled:Bool value and handle accordingly (rollback etc..)
        8. Cancelling: susceptible to race condition // has to be not-finished YET!
    2. Beyond basics
      1. Readiness & Dependencies
        1. Without Dependencies -> any ready operation can be executed (no order)
        2. Not limited by Queues ! // operationB.addDependency(operationA)
        3. Operation Deadlock // Dependency loop
      2. Abstraction of logic
      3. UI Operations:  UI can be put inside NSOperation !
        1. Authentication operation
        2. Watch video operation
        3. Alert
        4. Modal UI
      4. NSBlockExecution: execute blocks inside NSOperation!
      5. Composing Operations: nested Operations
        1. Downloading + Parsing = Import
        2. Dynamically create a Query inside a query and execute recursively !
      6. Mutual Exclusivity: only 1 operation of that kind to run at a time
        1. Alerts: only see 1 alert of a time // make the second alert dependent on 1st
        2. Videos: only watch 1 video at a time
        3. As long as the 2nd depends on the 1st -> mutually exclusive !
    3. Sample code
      1. Earthquakes & Operations
      2. Operation Observers: notified about events in operation’s lifecycle
        1. Operation start, end, generation
        2. Examples observers:
          1. Timeouts: cancel if run out of time
          2. Background: when app goes to background -> automatically start !
          3. Network activity indicator: retain the Indicator when begins & release when ends

Summary

Lots of cool stuffs can be done with NSOperations. The main output from this video is how to use Dependency to setup order between tasks.

A question in regard to real Mutual Exclusivity using Dependency: we can only do that if an order can be established, but what to do in case no specific order exists?

Apple Watch: Layout & Animations Make

(216) Video & Transcript

Layout API

Miguel Sanchez and Tom Witkin talked about how to create different complex layout on Watch and the cool animations we can do with it.

1. Fundamentals:

  • The layout on Watch is Flow-based (vertical, can choose horizontal for Group).
  • No code, only Storyboard !

2. WKInterfaceObject

  • the objects can be aligned horizontally (left, centre, right) and vertically (top, center, bottom)
  • size : relative, fixed or fitContentSize
  • OS2 expose: setHorizontalAlignment(enum), setVerticalAlignment(enum)
  • Sizing API: now you can change in code:
    • OS1: setWidth/ Height
    • OS2: setRelativeWidth/ Height: setRelativeWidth(0.75, 20) -> w = 0.75*container+20px
    • OS2: sizeToFitWidth/ Height
  • Zero: OS1 (default to storyboard), OS2: 0 = zero

3. WKInterfaceGroup

Group can contain other groups! Circle elements of 12 items can be done in 3 levels (top; centre – divided to left,centre, right; bottom)

Remember: Even hidden objects in Builder are created -> time-consuming !

4. Images

In OS1, there is transfer cost to move images to the Watch. In OS2 -> only installation cost (a large one on Watch now).

Animation API

5. Tables

In OS1, there are some transition animations that OS has done for us: insert, delete rows, updated content.

5.1 Insert a row and then remove that row within few seconds:

Screen Shot 2015-07-20 at 4.12.32 pm

5.2 To avoid animations, use setRowTypes() and setNumberOfRows(:, withRowType)

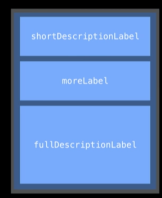
5.3 Expand a row on Tap:

Screen Shot 2015-07-20 at 4.15.04 pm

Screen Shot 2015-07-20 at 4.15.42 pm

Initially has FullDescriptionLabel hidden. On tap, we swap the hidden properties.

5.4 Rows reload when content changes in height:

If we reload a row and content not changing height -> no animation ! Make sure rows have “sizeToFit” height.

5.5 Rotate an image within a cell: use sequential images

5.6 Picker object: watch WatchKit-in-Depth part 2 !

5.7 Animatable Properties: animateWithDuration(duration: animationBlock)

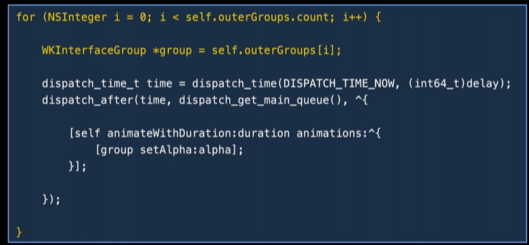
5.8 Sequential Animation: animate each of the circle sequentially

Screen Shot 2015-07-20 at 4.21.14 pm

Watch OS2

5.9 Use didAppear – not willActivate, as the didAppear is called after view has been displayed on screen.

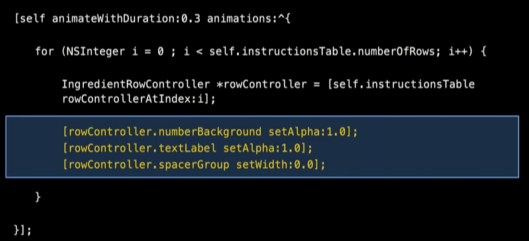
5.10 Invisible Spacer Group:

Screen Shot 2015-07-20 at 4.23.57 pm

Screen Shot 2015-07-20 at 4.24.47 pm

5.11 Animate Speech Bubble & Confirmation screen:

Initial state: button faded out.

Part 1: Animate the speech bubble IN:

Screen Shot 2015-07-20 at 4.26.40 pm

Screen Shot 2015-07-20 at 4.27.07 pm

Part 2: Show Confirmation screen:

Screen Shot 2015-07-20 at 4.28.01 pm

Reversing heights of the 2 groups:

Screen Shot 2015-07-20 at 4.28.53 pm

Notes: Animations not working on Glance / Notifications !

Should Watch: Designing with Animation

Apple Watch: Watch Kit tips & tricks + InterfaceController

(228) WatchKit Tips & Tricks (Video)

These are the very important Tips and Tricks that we should know when develop Apple Watch apps:

  1. Networking:  we want to do all the networking on Watch-Extension itself, not using the iPhone app (this approach will work on both OS1 and OS2), so use dispatch_semaphore to keep the background task alive! Screen Shot 2015-07-16 at 10.22.10 am
  2. Reach iPhone app: openParentApplication(reply:) won’t be on OS2. On OS2 we will be using WatchConnectivity. There are 4 different modes how to communicate with the counterpart app, we can send messages, files between apps (files will be waiting for iPhone app and delivered when the iPhone app launch later) check out:  https://developer.apple.com/library/prerelease/watchos/documentation/General/Conceptual/AppleWatch2TransitionGuide/UpdatetheAppCode.html#//apple_ref/doc/uid/TP40015234-CH6-SW1
  3. Use app Groups to share data, NSUserDefault should be used for state data only.
  4. Handoff – lots of things can, and should be left to the iPhone to perform, so use updateUserActivity(userInfo:webpageURL:) to update
  5. UI loading: definitely load visible elements first, then show immediately, then load things that users have to scroll to see. (Also, if something changes don’t reload everything).
  6. Interface Builder:  Images should be properly sized. Use setImageData() instead of setImage(), so we can choose encryption (PNG/JPG ..)
  7. Assets:  use assets, the 2X asset will be a fallback to be used if LARGER WATCHES come out in the future.
  8. Animated: reduce size and FPS (frame per second) … no need to have a high FPS, a lower one should suffice (24?). U
  9. Animation API on OS2: similar to UIView animation, we will be able to animate height, width, alpha, content insets … Lots of cool stuffs.
  10. Take user directly to voice dictation is possible
  11. Notifications: use body & title (for short look) of the alert key. Category key can actually specify which Interface Controller to be used for Long look. Static Notification is to be used in Notification Center, so do not neglect it.
  12. Glances: ensure always have content ! System-provided snapshot will be removed from UI when willActivate finishes, so do full-setup before willActivate finishes. Use absolute time instead of “10 minutes ago” as the “10 minutes ago” may not be updated info.

(?) Reloading Glance :

“As a user is swiping between Glances, well, ‘will activate’ is going to get called on yours, and so if they swipe past yours and in ‘will activate’ you’re loading a whole bunch of stuff, doing some processing, doing a network request, well, that’s probably not the most efficient you could be doing that.

So make sure that you are reloading very deliberately, depending on other circumstances and not just, ‘hey, they looked at my content.’ The other thing, as in with Watch apps, is to limit the number of alternate layouts.”

(?) Glance “disappear” issue:

“You’re loading in the content, everything’s going great, and then, oh, where did content go, and then boom, it slams in when it updates.” WHY? 

“So what happens is that system-provided snapshot is going to be removed from the UI when ‘will activate’ finishes. So a little contrary to what you do within the Watch app itself, here you want to make sure that you are doing your full setup before ‘willActivate’ finishes.”

You want to get all the information you need, set it so that the UI is up and ready to go so that when we remove that snapshot, it’s right there. There’s no in-between state of the whole screen disappearing.

The other thing that you should do is reload the content deliberately.

(?) Glance “interaction”:

As Apple Glance for Music can use Digital Crown to change the volume -> can we use the Crown to interact with the Glance? 

(?) Glance “Application Context”:

The piece of data that should be shown on Glance – should be put in Application Context which is sent from the iOS app ! (http://asciiwwdc.com/2015/sessions/713)

(?) Long-running data-fetching on Watch

“When fetching data from your Watch app, remember that your app can be deactivated at any time. If you use a default session for your request, your app might exit before it receives any data. To prevent your app from exiting immediately, you can use the performExpiringActivityWithReason:usingBlock: method ofNSProcessInfo to extend your app’s life for a short time.”

WK Interface Controller (Link)

The main cornerstone of WatchKit is this InterfaceController. It’s main functions, attributes and especially navigation-based stuffs are the must-know for developers !

  1. Use init & awakeWithContext: to initialise variables, load data, … For all InterfaceController except root-interface-controller -> need to save the context object passed. (Root has nil).
  2. willActivate should not initialise, only update the changed values.
  3. didDeactivate – any attempt to change UI is not working if the controller not active. This function is used to clean up. (Simulator: Use hardware ->lock to test deactivation).
  4. (Time consumption of init?) – How app architecture affects the initialisation of interface-controllers? From my understanding, the Page-based will initialise all pages first, but the hierarchy only initialise the first level? Or do all controllers in Storyboard got initialised?
  5. Use pushControllerWithName:context: to push new controller (WatchKit will perform animation). The Context object is the only way to tell the new controller what to display. 
  6. If we use SEGUEs -> use contextForSegueWithIdentifier:inTable:rowIndex: or contextForSegueWithIdentifier: - to specify the context object to pass on to the controller.
  7. Standard Input Interfaces:
    1. Alert & Action sheets: presentAlertControllerWithTitle:message:preferredStyle:actions:
    2. Text Input: presentTextInputControllerWithSuggestions:allowedInputMode:completion:
    3. Video & audio playback: presentMediaPlayerControllerWithURL:options:completion:
    4. Audio Recording: presentAudioRecordingControllerWithOutputURL:preset:maximumDuration:actionTitle:completion:
    5. Passkit Passes:  presentAddPassesControllerWithPasses:completion:
  8. Attributes:
    • Identifier
    • Title
    • IsInitialController //Root
    • HidesWhenLoading //Hide content until after willActivate
    • Background //Bg image
    • Mode //Mode for bg image
    • Animate //Animate bg image immediately
    • Color // Bg color
    • Insets
    • Spacing
  9. Subclassing: you want to subclass WKInterfaceController so to add your own properties to it – then later you can change the content. If Controller is to present Local/Push Notifications -> use WKNotificationInterfaceController
  10. Functions:
    1. init & awakeWithContext:   //Init
    2. willActivate & didDeactivate  //Activation events
    3. pushControllerWithName:context:, popController, popToRootController //Navigation
    4. presentControllerWithName:context:, presentControllerWithNames:contexts:, presentAlertControllerWithTitle:message:preferredStyle:actions:, dismissController  //Modal
    5. +reloadRootControllersWithNames:contexts:, becomeCurrentPage //Page-based
    6. contextForSegueWithIdentifier:contextsForSegueWithIdentifier:, contextForSegueWithIdentifier:inTable:rowIndex:, contextsForSegueWithIdentifier:inTable:rowIndex: //Segues
    7. animateWithDuration:animations: //Animation
    8. presentTextInputControllerWithSuggestions:allowedInputMode:completion:, dismissTextInputController   //Text Input
    9. presentMediaPlayerControllerWithURL:options:completion: and dismissMediaPlayerController //Video
    10. presentAudioRecordingControllerWithOutputURL:preset:maximumDuration:actionTitle:completion: and dismissAudioRecordingController //Audio
    11. table:didSelectRowAtIndex: //Table Selection
    12. //Context-Menu
    13. setTitle:
    14. updateUserActivity:userInfo:webpageURL: , invalidateUserActivity and handleUserActivity: //Handoff
    15. presentAddPassesControllerWithPasses:completion: and dismissAddPassesController //Passkit
    16. contentFrame Property